SSH Into Raspberry Pi From Anywhere: Your Ultimate Guide
Ever dreamt of wielding complete control over your Raspberry Pi, that pint-sized powerhouse, from the comfort of your Mac, all without the tangle of cables and the limitations of a physical screen? The ability to remotely access your Raspberry Pi via Secure Shell (SSH) is not just a convenience, but a gateway to seamless management, unlocking a universe of possibilities for developers, hobbyists, and tech enthusiasts alike.
Remote access via SSH is, without a doubt, one of the most efficient and secure means of interacting with your Raspberry Pi, particularly when it resides behind a network address translation (NAT) router. But what exactly is SSH, and how can it transform your interaction with your Raspberry Pi projects? SSH, or Secure Shell, is a cryptographic network protocol operating on a client-server model. The SSH server, by default, listens on TCP port 22, on the Raspberry Pi, accepting secure connections. On the other hand, the SSH client, which resides on your Mac, facilitates secure communication through the encrypted channel. This architecture ensures that all data transmitted between your Mac and the Raspberry Pi, including commands and responses, is encrypted, safeguarding your data from potential eavesdropping.
Navigating the complexities of a NAT router might seem daunting at first, but with the right tools and a little know-how, you can establish a secure connection from anywhere in the world. This is where the power of SSH truly shines, offering remote command-line access, effectively giving you the keys to your Raspberry Pi kingdom from afar. This ability is especially crucial if your Raspberry Pi is dedicated to projects such as running a home server, monitoring sensors, or managing Internet of Things (IoT) devices.
Setting up remote access, however, is not always straightforward. Your home network is likely protected by a NAT router, acting as a barrier between your Raspberry Pi and the vast expanse of the internet. This is where port forwarding comes into play essentially, you're creating a pathway through your router's firewall, allowing incoming SSH traffic to reach your Raspberry Pi. This process often involves configuring your router's settings to forward requests on port 22 (the default SSH port) to the internal IP address of your Raspberry Pi. Keep in mind that the specifics of this configuration will vary based on the brand and model of your router.
Many of the challenges can be addressed by employing solutions like Tailscale. Tailscale, built on WireGuard, utilizes a mesh VPN architecture that simplifies secure access to your Raspberry Pi. With Tailscale, you create a private network that extends beyond the boundaries of your home network, allowing you to connect to your Raspberry Pi from any location. In addition to security, Tailscale also simplifies the often-complicated task of port forwarding and dealing with dynamic IP addresses by providing each device with its own unique IP address within the Tailscale network.
As a compelling alternative, you could consider using Cloudflare Tunnels. In practice, Cloudflare Tunnels create a secure and outbound-only connection from your Raspberry Pi to Cloudflare's network. Cloudflare then acts as a proxy, enabling you to access your Raspberry Pi without having to open any ports on your router. This is particularly useful if your home internet connection is behind a Carrier-Grade NAT (CGNAT), which often complicates or prevents traditional port forwarding.
The process of gaining remote access begins with understanding how to SSH into your Raspberry Pi from behind a firewall using your Mac. Secure Shell (SSH) is the cornerstone, providing remote command-line access. This allows you to manage and control your IoT devices remotely. For remote SSH IoT behind a router, SSH is an essential tool. It follows a client-server model, with the SSH server running on the Raspberry Pi and the SSH client on your laptop or PC. When you are on the same network, you will likely use the private IP address of the Pi to SSH. The ability to remotely access your Raspberry Pi behind a firewall or NAT router is not just a convenience; it is a necessity in many scenarios.
Directly connecting to your Raspberry Pi behind a firewall from anywhere, as if it were on the local network, is a remarkable advantage. The ability to send commands and batch jobs to your Raspberry Pi from a web portal is another powerful capability. It eliminates the need to discover the IoT device's IP address and change any firewall settings. The next level involves enabling a remote VNC connection, which significantly enhances your control capabilities.
The process of getting remote access to your Raspberry Pi over SSH can vary. The specifics are determined by your particular network configuration, particularly the nature of your home router. The following are essential for success: you need to assign a static IP address to the Raspberry Pi, and then you need to configure port forwarding in your routers management interface, typically using the virtual server option. The router will need to be told to forward all traffic on port 22 (the default SSH port) to the static IP address assigned to your Raspberry Pi. As a practical matter, you must always keep your Raspberry Pi secure. Ensure the security of your Raspberry Pi by changing the default password. Additional steps can be taken to improve security: disabling password-based authentication and using SSH keys is the best practice.
For those looking for a deeper dive, there are numerous resources available. The Raspberry Pi Foundation's official website offers extensive documentation. The goal is to securely connect to your Raspberry Pi from outside your home network. There are many excellent tutorials available online that will take you through the steps in detail. When configuring remote access, you may also be dealing with a CGNAT environment, in which case you will not be able to access your device unless you use the services like Tailscale or Cloudflare Tunnels. You can also use dynamic DNS services to keep track of your Pi's IP address.
Software-wise, the options are plentiful. For remote access to your Raspberry Pi, you have various choices. You can use the Raspberry Pi OS, connect Raspberry Pi desktop for PC and Mac, Android, Debian, FreeBSD, Gentoo Linux, Kernel NetBSD, OpenSUSE, Plan 9, Puppy, and Arch. This provides you with the versatility needed to manage your device effectively, regardless of your platform.
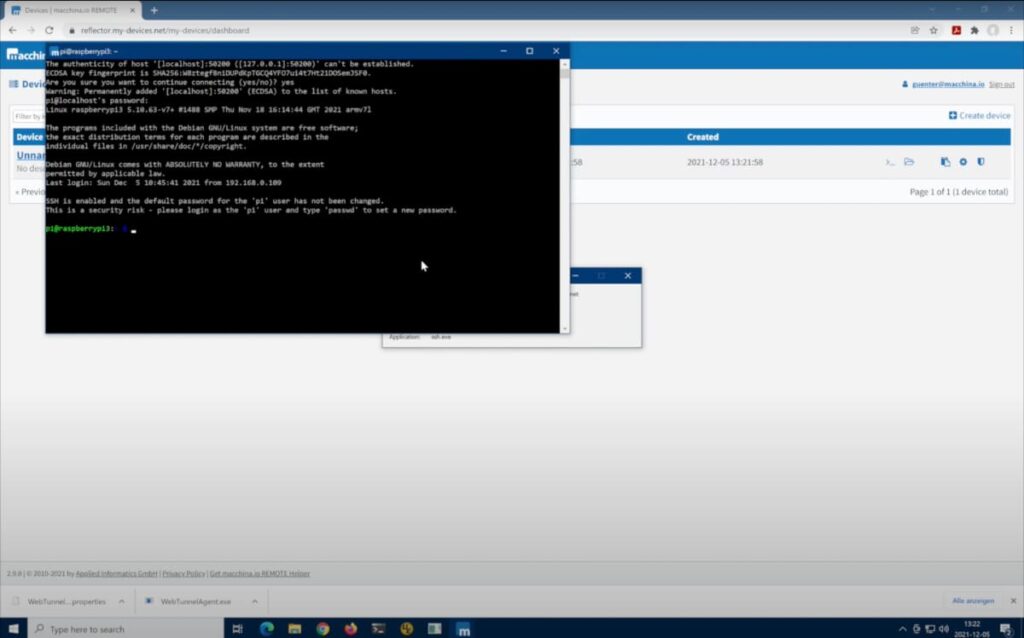
To recap, setting up remote SSH access for your Raspberry Pi opens a world of possibilities, allowing you to manage your projects from anywhere with an internet connection. It is a skill that all developers, hobbyists, and tech enthusiasts should have. SSH is a powerful tool for controlling desktop machines and other servers. The following example uses a command-line-based OpenSSH client tool to connect to the Raspberry Pi IoT SSH shell. It allows you to access the command line of your Raspberry Pi from another computer, enabling you to manage and control your IoT devices remotely.
Here's a summary of key takeaways:
- SSH is secure: It encrypts all communication between your Mac and your Raspberry Pi.
- Port forwarding is essential: To access your Pi behind a NAT router.
- Alternative solutions exist: Tailscale and Cloudflare Tunnels simplify remote access.
- Security is paramount: Always change the default password and consider SSH keys.